
Author: Andrew Ren (TiDB Cloud Solutions Architect at PingCAP)
A data catalog is a collection of data metadata. The catalog is a glossary and inventory of available data across different data platforms such as databases, data warehouses, and data lakes. Data users, particularly analysts and data scientists, use it to help find specific data that they need. You can use the data catalog to store, annotate, and share metadata.
TiDB Cloud is a fully managed cloud service of TiDB. The user experience is similar to Amazon Relational Database Service (RDS) and Google Cloud SQL. With some simple clicks in the UI, you can get a fully functional production-ready database in either Amazon Web Services (AWS) or Google Cloud Platform (GCP).
AWS Glue Data Catalog contains references to data that is used as sources and targets of your extract, transform, and load (ETL) jobs in AWS Glue. To create your data warehouse or data lake, you must catalog this data.
This tutorial will walk you through how to integrate TiDB Cloud with AWS Glue Data Catalog and manage TiDB metadata with the catalog. Major steps include:
- Prepare your AWS account with the necessary networking and access configurations.
- Create a TiDB Cloud on demand cluster.
- Create an AWS Glue Data Catalog and link your TiDB Cloud cluster to it.
- Create test data and check out the data catalog.
- Clean up the test environment.

TiDB Cloud and AWS Glue Data Catalog Architecture
Before you begin
Before you try the steps in this article, make sure you have:
- A basic understanding of AWS
- An AWS account
- A TiDB Cloud account. (If you do not have a TiDB Cloud account, click here to sign up for one.)
Prepare your AWS account
The first step is to prepare your account for AWS Glue and AWS Glue Data Catalog.
Create an S3 endpoint
Create an Amazon Simple Storage Service (S3) endpointand attach it to the Amazon Virtual Private Cloud (VPC). This S3 endpoint is needed for Glue to export logs from your Glue workers in the VPC to S3.
- Go to AWS VPC. In the left panel, click Endpoints.
- Click Create Endpoint.
- In the Service name field, search for s3; select the Gateway type, and create the endpoint.
Please note your AWS account ID, VPC ID, and VPC’s Classless Inter-Domain Routing (CIDR). You’ll be entering them in a later step.
Create a security group
Create a security group in the VPC named glue_eni. Later, you will assign it to the Glue worker so that it has network access.
- Create a security group, name it glue_eni.
- Set security group inbound and outbound rules.
- Specify a self-referencing inbound rule for all TCP ports, to allow AWS Glue components to communicate and also prevent access from other networks.
- Allow all outbound traffic. (These are the default settings.)
Prepare an IAM role
Prepare an Identity and Access Management (IAM) role to grant the necessary permissions to the Glue worker.
- Create an IAM role, choose use case glue, and name it glue_iam.
- Assign the policy AWSGlueServiceRole to glue_iam.

Create a TiDB Cloud on demand cluster
Now that your AWS account is ready, create a TiDB Cloud cluster and connect it to your AWS VPC environment.
Set up a customized CIDR
Before you create a TiDB Cloud cluster, set up a customized CIDR for TiDB Cloud, so you can link the TiDB Cloud VPC and your own AWS VPC later via VPC Peering.
- Go to your TiDB Cloud console and
- Click Network Access.
- Select Project CIDR.
- Input the CIDR. Make sure it’s different from your existing AWS VPC’s CIDR. Otherwise, you won’t be able to VPC peer them.
Create a TiDB Cloud cluster
Now comes the exciting part: creating a TiDB Cloud cluster. Since it’s just a test, you can create the smallest usable cluster size: one TiDB node and three TiKV nodes.
- Go to your TiDB Cloud console. At the top right of the screen, click Create a cluster.
- Set Cluster Name to test.
- Set your Root Password and note it for future use.
- Change the number of TiDB/TiKV nodes and click Create.

Your TiDB Cloud cluster will be created in approximately 5 to 10 minutes.
Connect TiDB Cloud to AWS VPC
Connect your TiDB Cloud environment to AWS VPC through VPC peering.
- Go to your TiDB Cloud console and click Network Access.
- Click VPC Peering.
- Click Add and configure VPC peering to my AWS VPC.
- Select AWS as the cloud provider.
- Input the AWS account ID, VPC ID, and its CIDR. (You can find this information in the AWS console.)
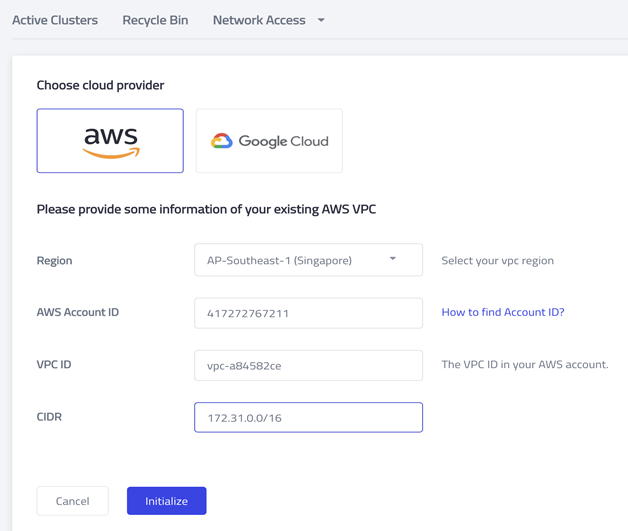
- Click Initialize. You should see the following screen.

Accept the invitation in AWS
VPC peering has been initialized, but there’s no peering ID yet because you haven’t accepted the invitation in your AWS account.
- In your AWS console, go to the VPC page.
- In the left panel, click Peering connections.
- Find the following VPC peering request.

- Click Accept request.

Verify the VPC peering status
Check that the VPC peering status is already active.
- Return to your TiDB Cloud console.
- Click Network Access.
- Click VPC Peering. You should see the Status has changed into active.

Now you have the two VPCs connected, but Glue workers can’t yet access the TiDB Cloud cluster. To fully grant access, you need to add two more networking configurations on the AWS side.
Add networking configurations
In your AWS VPC’s route tables, add routing to the VPC peering CIDR so that the VPC router knows where to send the traffic when its target is the TiDB Cloud’s CIDR.
- Go to the VPC page in your AWS console. In the left panel, click Route Tables.
- To enter the detail page, click on your route table’s ID.
- On the right side of the screen, click Edit routes. Then click Add route.
- Set Destination as your TiDB Cloud CIDR.
- Set Target as the alias of your VPC peering. (It is prefixed with pcx-.)
- Click Save changes.

Allow inbound traffic
Next, in the glue_eni security group, allow all inbound traffic from the TiDB Cloud CIDR, so that the security group allows the traffic from Glue workers to the TiDB Cloud database.
- Go to the VPC page in your AWS console. In the left panel, click Security Groups.
- To enter the detail page, find glue_eni and click on its ID.
- Click Edit inbound rules. Then click Add rule.
- Set Type as All traffic.
- Set Source as Custom.
- In the input box behind Source, enter your TiDB Cloud’s CIDR.
- Click Save rules.

The network setup is done. Once you know the endpoint of the TiDB cluster, you will be able to connect to it.
Get the endpoint
Go to your TiDB console and click into the detail page of the TiDB cluster you just created.
- Click Connect.
- Choose VPC Peering and click Creating Endpoint.
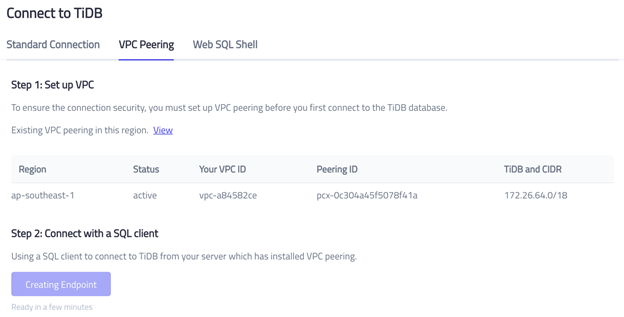
Make a note of the endpoint because you’ll need this information to create the Data Catalog in the next section.

Create the Data Catalog
AWS Glue can manage TiDB’s metadata, but it needs to know where to look for the data. That’s why you’ll need to configure a database, a connection, and a crawler.
Add a database
- Go to the AWS Glue console.
- In the left panel, click Database.
- Click Add database.
- Set Database name as tidb.
- Click Create.

Add a connection
- In the left panel, click Connections.
- Click Add connection.
- Set Connection name as tidb.
- Set the Connection type as JDBC.
- Click Next.
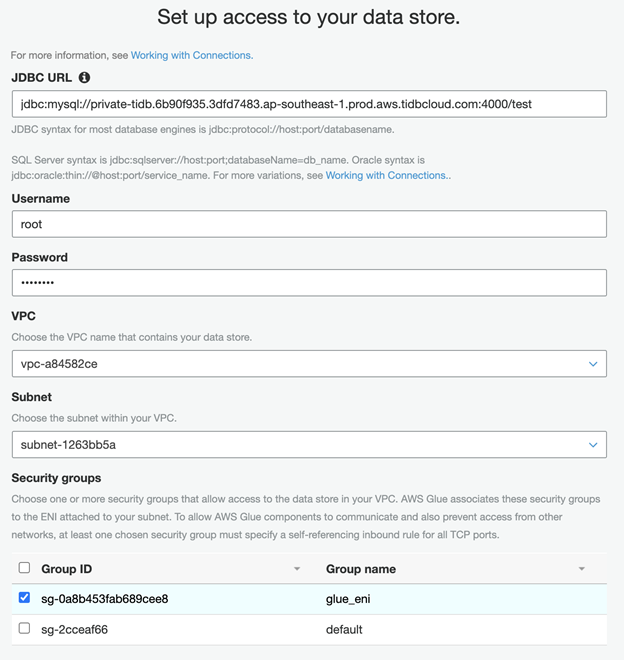
- Configure the JDBC URL in the following format, replacing endpoint with the endpoint you noted in the previous section:
jdbc:mysql://[tidb cloud endpoint]:4000/test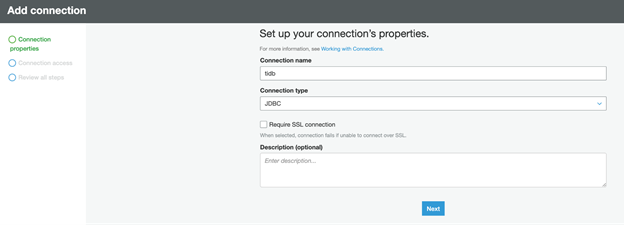
- Set Username to root.
- Set Password to your TiDB Cloud cluster password.
- Choose the VPC and Subnet.
- Select glue_eni as the security group.
- Finish the creation flow.
Test the connection
To make sure your setup is correct, test the connection:
- In the connection list, select the connection you created.
- Click Test connection.
- You should see a green note in the console “tidb connected successfully to your instance.”
Create a crawler
The Glue crawler crawls the metadata via the database connection. To create a crawler.
- In the left panel, click Crawlers.
- Click Add crawler.
- Set Crawler name as tidb.
- Keep the default values for Crawler source type and Repeat crawls of S3 data stores and click Next.
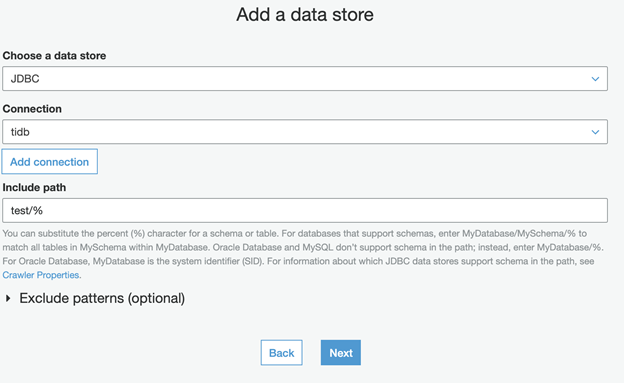
- Set Choose a data store as JDBC.
- Set Connection as tidb.
- Set Include path as test/%.
- Click Next.
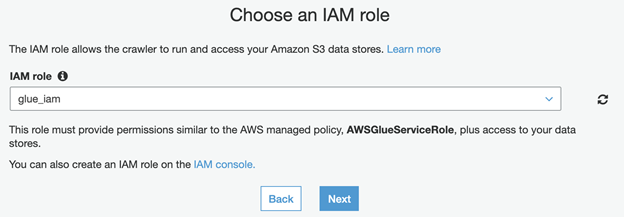
- Set IAM role as glue_iam.
- Click Next.
- Set Database as tidb.
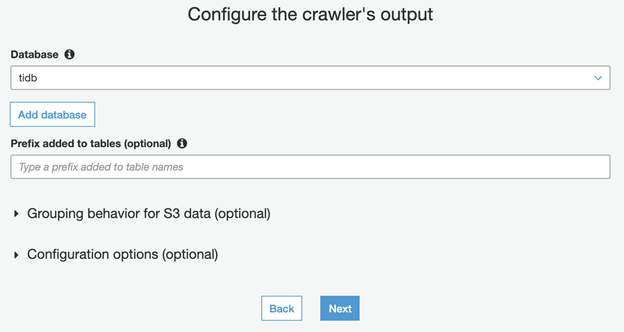
Now all Glue setups are ready—you have a database, a connection, and a crawler. Next, you’ll need some test data to run the crawler and see what happens.
Create a test data in the TiDB Cloud cluster
Use TiDB Cloud’s web shell feature to insert the test data. With this approach, you won’t need to create extra EC2 instances.
- Go to your TiDB Cloud console.
- Go to the TiDB cluster you created.
- Click Connect.
- Select Web SQL Shell.
- Click Open SQL Shell.

Run the following queries one by one to insert two tables into the database test.
Use test;CREATE TABLE t1 (a int);CREATE TABLE t2 (
id BIGINT NOT NULL PRIMARY KEY auto_increment,
b VARCHAR(200) NOT NULL
);
Leave the web SQL shell open so that you can come back later to manipulate the schema and test how the data catalog picks up schema changes.
Check the Data Catalog
Run the crawler
Run the crawler to collect metadata from the TiDB Cloud cluster.
- Go to the AWS Glue console, and choose crawler.
- Select the tidb crawler.
- Click the Run crawler button.
This example shows a crawler that was configured manually, so you can see how it works step by step. In production, you can always set it up to run on a schedule, so it can pick up your metadata changes automatically.

After about two minutes, the crawler finishes its task.

Verify the results
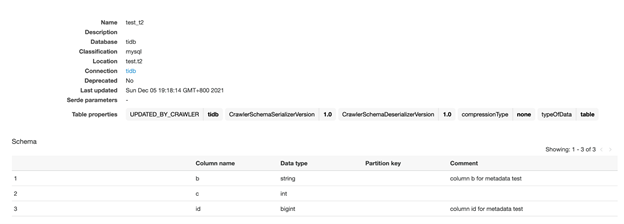
Go to the tables and check the synchronization results. In the left panel, under Databases, click Tables. The two test tables you created are now in the Data Catalog.

If you click into table t2, you’ll be able to see it correctly recorded in the two columns that were created.
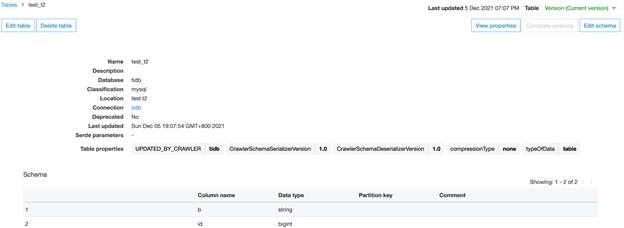
You can add comments to the two columns in production to explain what these fields are for.

To add a new column to table t2, go back to TiDB Cloud’s web SQL shell and run the following query.
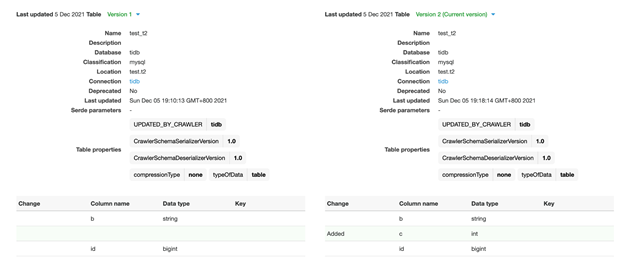
ALTER TABLE t2 ADD COLUMN c INT NOT NULL;Now return to the AWS Glue console and run the TiDB crawler again.
Afterwards, check the table details again, and you’ll see that a new column is added. The comments on the old columns remain unchanged.
On the top right, click Compare versions to show the table versions and their differences.
Clean up the test environment
Make sure to clean up the test environment so that you don’t get a surprise bill:
- Delete the TiDB Cloud cluster.
- Delete the Glue crawler, connection, and database.
- Delete the glue_eni security group.
- Delete the glue_iam IAM role.
- Delete VPC peering and the route table rule.
Summary
TiDB Cloud and the AWS Glue Data catalog can work seamlessly together without any customization. This tutorial treated TiDB Cloud as a normal JDBC connection, and it worked out well. Using the networking configuration shown in this tutorial to connect TiDB Cloud and AWS Glue, you’ll be able to automatically synchronize all metadata changes from your TiDB Cloud cluster to AWS Glue. Also, you can use the AWS Glue Data Catalog to annotate the metadata and manage metadata versions.
Ready to give TiDB Cloud a try? TiDB Cloud Developer Tier is now available. You can run a TiDB cluster for free for one year on Amazon Web Services. And make sure to follow us on Twitter to stay updated on TiDB Cloud news!
If you are interested in this topic and want to learn more, check out the following resources:
TiDB Cloud Dedicated
TiDB Cloudのエンタープライズ版。
専用VPC上に構築された専有DBaaSでAWSとGoogle Cloudで利用可能。
TiDB Cloud Serverless
TiDB Cloudのライト版。
TiDBの機能をフルマネージド環境で使用でき無料かつお客様の裁量で利用開始。


